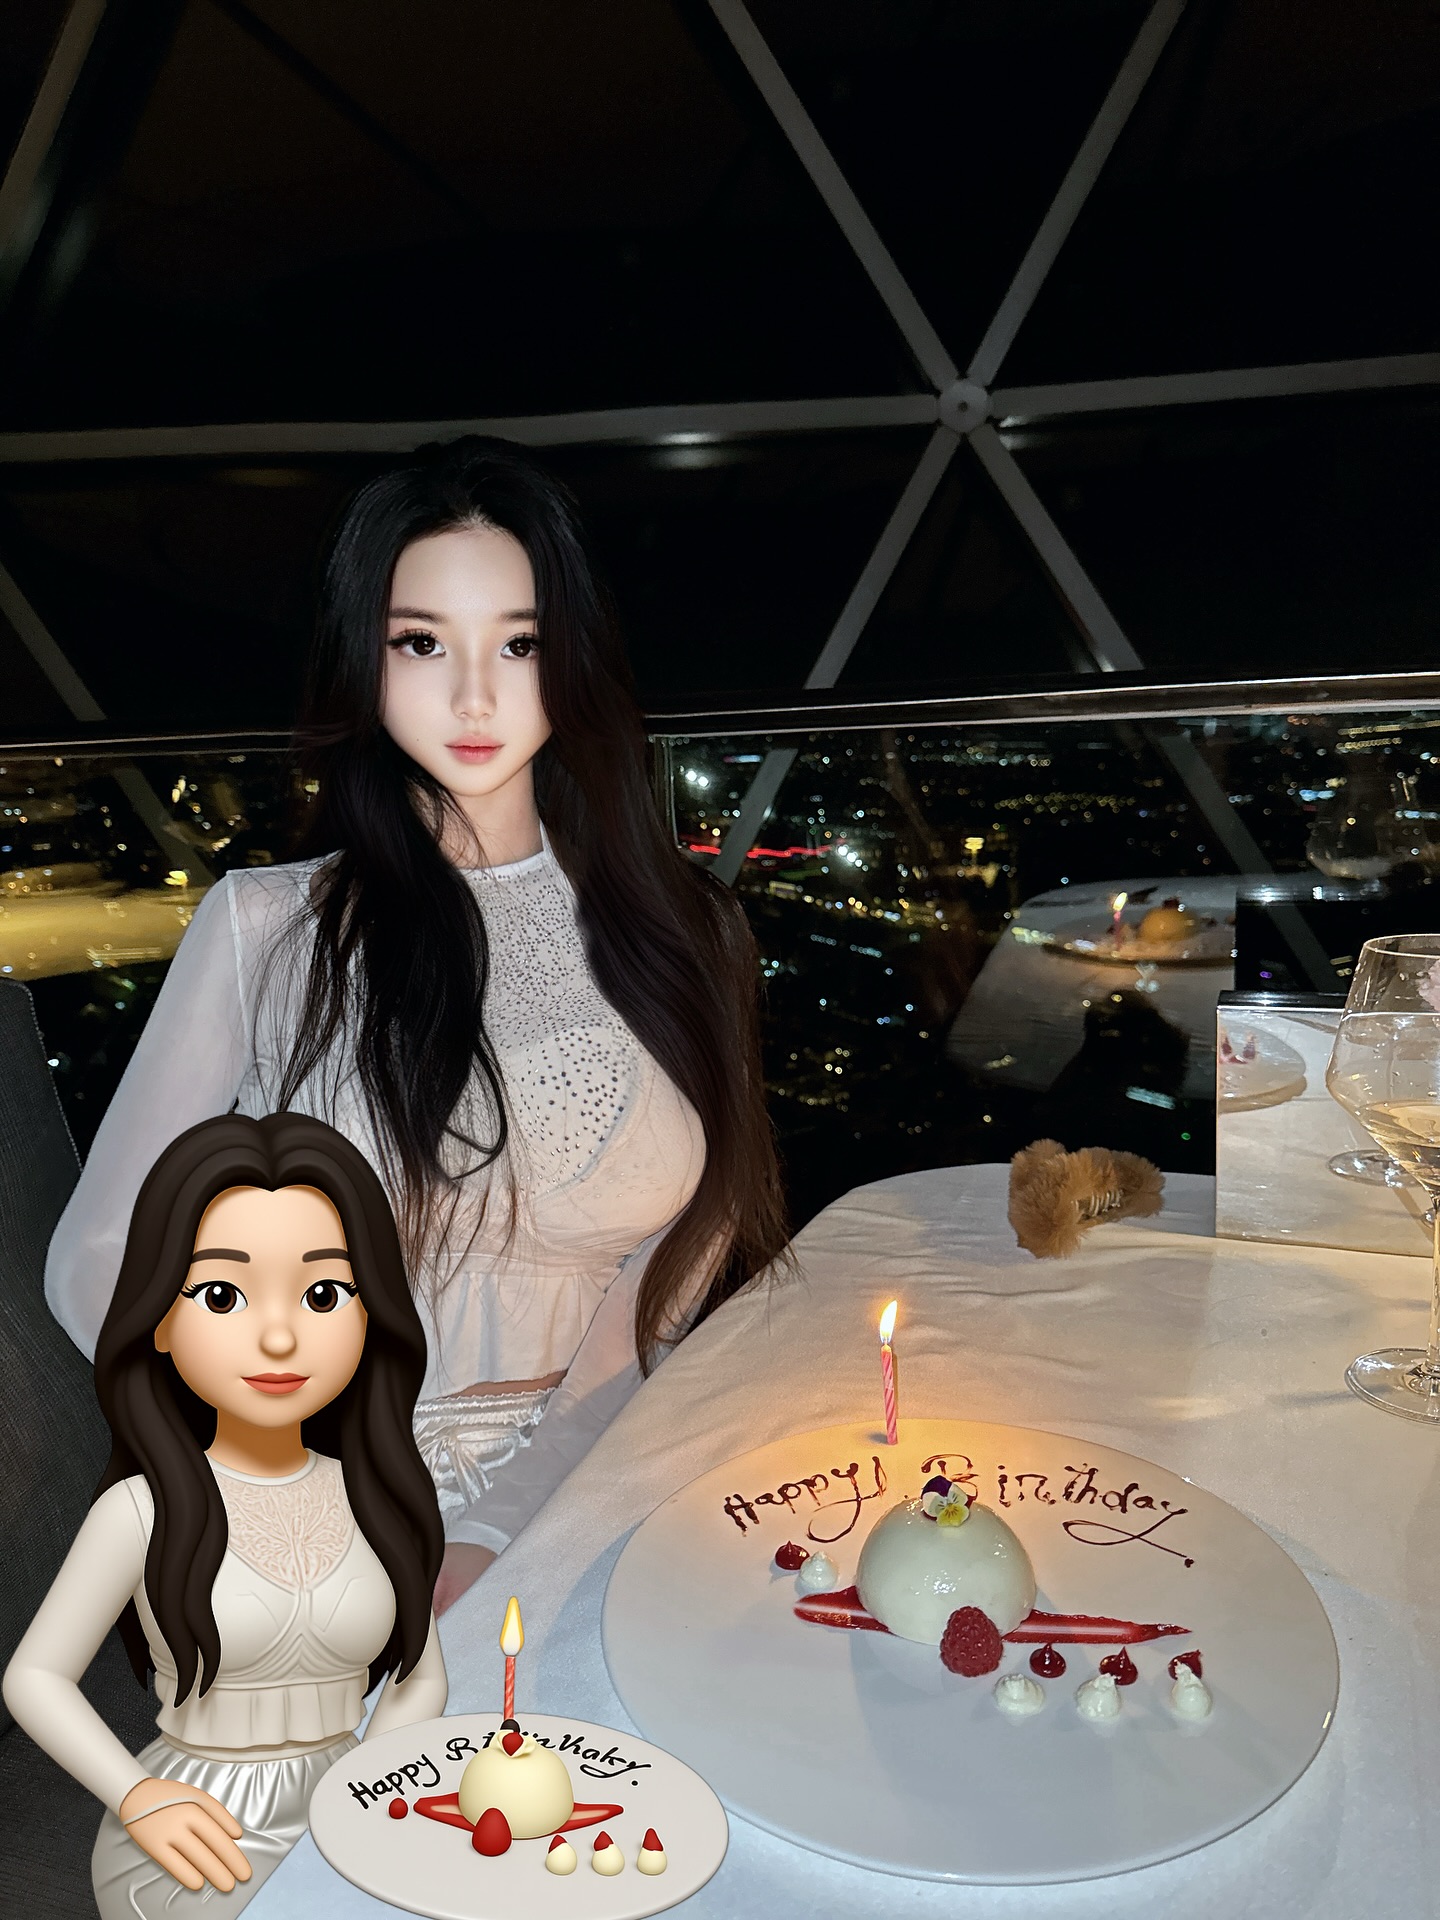
• Homemade Sushi Rolls

    Delicious and Fresh Homemade Sushi Rolls with Assorted Fillings

    Ingredients:

    2 cups sushi rice

    2 1/2 cups water

    1/3 cup rice vinegar

    2 tablespoons sugar

    1 teaspoon salt

    10 sheets nori (seaweed)

    1/2 pound fresh sushi-grade raw fish (salmon, tuna, or preferred) thinly sliced

    1 cucumber, julienned

    1 avocado, sliced

    2 tablespoons mayonnaise (optional)

    Soy sauce, pickled ginger, and wasabi for serving

    Directions:

    Rinse the sushi rice in cold water until the water runs clear. Combine rice and water in a rice cooker or pot and cook according to package instructions.

    In a small saucepan, heat rice vinegar, sugar, and salt until dissolved. Pour the mixture over cooked rice and gently fold to combine. Let cool to room temperature.

    Place a bamboo sushi mat on a clean surface and lay one sheet of nori on top. With wet hands, spread a thin layer of rice evenly over the nori, leaving a 1-inch border at the top edge.

    Arrange your choice of fillings (fish, cucumber, avocado, and a drizzle of mayonnaise if using) in a line along the bottom edge of the rice.

    Using the bamboo mat, roll the sushi tightly from the bottom to the top, pressing gently to form a firm roll.

    Using a sharp knife, slice the roll into 6-8 pieces. Repeat with remaining ingredients.

    Serve with soy sauce, pickled ginger, and wasabi.

    Prep Time: 30 minutes | Cooking Time: 20 minutes | Total Time: 50 minutes
    Kcal: Approx. 300 kcal per serving
    Servings: 4 servings

    #sushirolls #homemadesushi #sushitime #japanesefood #freshsushi #riceandnori #seafoodlover #sushimaking #easyrecipes #foodie #asianfood #healthymeals #sushilovers #freshingredients #diyfood #handrolls #sushilife #japanesecuisine #seaweedwrap #foodprep

    Ready to impress with homemade sushi? These fresh sushi rolls are fun to make and delicious to eat! Try your favorite fillings and enjoy sushi night at home!
    Homemade Sushi Rolls Delicious and Fresh Homemade Sushi Rolls with Assorted Fillings Ingredients: 2 cups sushi rice 2 1/2 cups water 1/3 cup rice vinegar 2 tablespoons sugar 1 teaspoon salt 10 sheets nori (seaweed) 1/2 pound fresh sushi-grade raw fish (salmon, tuna, or preferred) thinly sliced 1 cucumber, julienned 1 avocado, sliced 2 tablespoons mayonnaise (optional) Soy sauce, pickled ginger, and wasabi for serving Directions: Rinse the sushi rice in cold water until the water runs clear. Combine rice and water in a rice cooker or pot and cook according to package instructions. In a small saucepan, heat rice vinegar, sugar, and salt until dissolved. Pour the mixture over cooked rice and gently fold to combine. Let cool to room temperature. Place a bamboo sushi mat on a clean surface and lay one sheet of nori on top. With wet hands, spread a thin layer of rice evenly over the nori, leaving a 1-inch border at the top edge. Arrange your choice of fillings (fish, cucumber, avocado, and a drizzle of mayonnaise if using) in a line along the bottom edge of the rice. Using the bamboo mat, roll the sushi tightly from the bottom to the top, pressing gently to form a firm roll. Using a sharp knife, slice the roll into 6-8 pieces. Repeat with remaining ingredients. Serve with soy sauce, pickled ginger, and wasabi. Prep Time: 30 minutes | Cooking Time: 20 minutes | Total Time: 50 minutes Kcal: Approx. 300 kcal per serving Servings: 4 servings #sushirolls #homemadesushi #sushitime #japanesefood #freshsushi #riceandnori #seafoodlover #sushimaking #easyrecipes #foodie #asianfood #healthymeals #sushilovers #freshingredients #diyfood #handrolls #sushilife #japanesecuisine #seaweedwrap #foodprep 🍣 Ready to impress with homemade sushi? These fresh sushi rolls are fun to make and delicious to eat! Try your favorite fillings and enjoy sushi night at home! 🍱✨
    0 Comentários ·0 Compartilhamentos ·15KB Visualizações
  • Air Fryer New York Strip Steak

    Perfectly Seared Air Fryer New York Strip Steak

    Ingredients:

    2 New York strip steaks (about 8 oz each, 1-inch thick)

    2 tablespoons olive oil

    2 teaspoons kosher salt

    1 teaspoon freshly ground black pepper

    1 teaspoon garlic powder

    1/2 teaspoon smoked paprika (optional)

    Fresh rosemary or thyme sprigs (optional, for garnish)

    Directions:

    Remove steaks from the refrigerator and let them sit at room temperature for 20-30 minutes before cooking.

    Preheat the air fryer to 400°F (200°C) for 5 minutes.

    Pat steaks dry with paper towels. Rub olive oil over both sides of each steak.

    Season both sides generously with salt, pepper, garlic powder, and smoked paprika (if using).

    Place steaks in the air fryer basket, ensuring they are not touching.

    Cook at 400°F for 8-10 minutes for medium-rare, flipping halfway through. Adjust cooking time based on desired doneness:

    Rare: 6-7 minutes

    Medium: 10-12 minutes

    Well done: 12-14 minutes

    Remove steaks and let rest for 5 minutes before slicing. Garnish with fresh rosemary or thyme if desired.

    Prep Time: 10 minutes | Cooking Time: 10 minutes | Total Time: 20 minutes
    Kcal: Approximately 450 kcal per steak
    Servings: 2 servings

    #airfryerrecipes #newyorkstrip #steaklover #easyairfryer #steakdinner #airfryersteak #quickmeals #proteinpacked #meatlover #steaknight #juicysteak #homemadesteak #airfrying #grillingindoors #weeknightdinner #keto #lowcarbmeals #comfortfood #foodie #airfryer

    Craving steak but want it quick and easy? Try this Air Fryer New York Strip Steak—juicy, tender, and perfectly seared every time!
    Air Fryer New York Strip Steak Perfectly Seared Air Fryer New York Strip Steak Ingredients: 2 New York strip steaks (about 8 oz each, 1-inch thick) 2 tablespoons olive oil 2 teaspoons kosher salt 1 teaspoon freshly ground black pepper 1 teaspoon garlic powder 1/2 teaspoon smoked paprika (optional) Fresh rosemary or thyme sprigs (optional, for garnish) Directions: Remove steaks from the refrigerator and let them sit at room temperature for 20-30 minutes before cooking. Preheat the air fryer to 400°F (200°C) for 5 minutes. Pat steaks dry with paper towels. Rub olive oil over both sides of each steak. Season both sides generously with salt, pepper, garlic powder, and smoked paprika (if using). Place steaks in the air fryer basket, ensuring they are not touching. Cook at 400°F for 8-10 minutes for medium-rare, flipping halfway through. Adjust cooking time based on desired doneness: Rare: 6-7 minutes Medium: 10-12 minutes Well done: 12-14 minutes Remove steaks and let rest for 5 minutes before slicing. Garnish with fresh rosemary or thyme if desired. Prep Time: 10 minutes | Cooking Time: 10 minutes | Total Time: 20 minutes Kcal: Approximately 450 kcal per steak Servings: 2 servings #airfryerrecipes #newyorkstrip #steaklover #easyairfryer #steakdinner #airfryersteak #quickmeals #proteinpacked #meatlover #steaknight #juicysteak #homemadesteak #airfrying #grillingindoors #weeknightdinner #keto #lowcarbmeals #comfortfood #foodie #airfryer 🔥🥩 Craving steak but want it quick and easy? Try this Air Fryer New York Strip Steak—juicy, tender, and perfectly seared every time! 🍽️👌
    0 Comentários ·0 Compartilhamentos ·15KB Visualizações
  • Lime Cilantro Rice

    Zesty Lime and Fresh Cilantro Flavored Rice

    Ingredients:

    1 cup long-grain white rice

    2 cups water

    1 tablespoon olive oil or butter

    1/2 teaspoon salt

    Zest of 1 lime

    Juice of 1 lime

    1/2 cup fresh cilantro, chopped

    1 clove garlic, minced (optional)

    Directions:

    Rinse the rice under cold water until the water runs clear to remove excess starch.

    In a medium saucepan, bring water to a boil. Add olive oil (or butter) and salt.

    Stir in the rice, reduce heat to low, cover, and simmer for 15-18 minutes, or until the rice is tender and water is absorbed.

    Remove from heat and let sit covered for 5 minutes.

    Fluff rice with a fork, then stir in lime zest, lime juice, minced garlic (if using), and chopped cilantro.

    Adjust seasoning with salt if needed and serve warm.

    Prep Time: 5 minutes | Cooking Time: 18 minutes | Total Time: 23 minutes
    Kcal: Approximately 200 kcal per serving
    Servings: 4 servings

    #limecilantrice #cilantrice #zestyrice #flavoredrice #sidedish #mexicanrice #ricerecipes #easyrecipes #vegetarian #glutenfree #freshherbs #healthyrecipes #mealprep #comfortfood #homemadecooking #simplemeals #limerice #cilantrolover #familymeals #foodie

    Brighten up your meal with this zesty Lime Cilantro Rice! Fresh, flavorful, and the perfect side for any dish. Ready in under 30 minutes!
    Lime Cilantro Rice Zesty Lime and Fresh Cilantro Flavored Rice Ingredients: 1 cup long-grain white rice 2 cups water 1 tablespoon olive oil or butter 1/2 teaspoon salt Zest of 1 lime Juice of 1 lime 1/2 cup fresh cilantro, chopped 1 clove garlic, minced (optional) Directions: Rinse the rice under cold water until the water runs clear to remove excess starch. In a medium saucepan, bring water to a boil. Add olive oil (or butter) and salt. Stir in the rice, reduce heat to low, cover, and simmer for 15-18 minutes, or until the rice is tender and water is absorbed. Remove from heat and let sit covered for 5 minutes. Fluff rice with a fork, then stir in lime zest, lime juice, minced garlic (if using), and chopped cilantro. Adjust seasoning with salt if needed and serve warm. Prep Time: 5 minutes | Cooking Time: 18 minutes | Total Time: 23 minutes Kcal: Approximately 200 kcal per serving Servings: 4 servings #limecilantrice #cilantrice #zestyrice #flavoredrice #sidedish #mexicanrice #ricerecipes #easyrecipes #vegetarian #glutenfree #freshherbs #healthyrecipes #mealprep #comfortfood #homemadecooking #simplemeals #limerice #cilantrolover #familymeals #foodie 🌿🍚 Brighten up your meal with this zesty Lime Cilantro Rice! Fresh, flavorful, and the perfect side for any dish. Ready in under 30 minutes! 🍋✨
    0 Comentários ·0 Compartilhamentos ·15KB Visualizações
  • Moroccan Chicken Tagine

    Aromatic Moroccan Chicken Tagine with Apricots and Spices

    Ingredients:

    4 bone-in, skin-on chicken thighs

    2 tablespoons olive oil

    1 large onion, thinly sliced

    3 cloves garlic, minced

    1 teaspoon ground ginger

    1 teaspoon ground cinnamon

    1 teaspoon ground cumin

    1/2 teaspoon turmeric

    1/2 teaspoon paprika

    Salt and black pepper to taste

    1 cup chicken broth

    1 cup canned diced tomatoes

    1/2 cup dried apricots, chopped

    1/4 cup green olives, pitted and sliced

    1 tablespoon honey

    Fresh cilantro or parsley for garnish

    Toasted slivered almonds (optional)

    Directions:

    Heat olive oil in a large heavy-bottomed pot or traditional tagine over medium heat.

    Season chicken thighs with salt and pepper. Brown them skin-side down for 5-7 minutes until golden, then flip and cook for another 3 minutes. Remove chicken and set aside.

    In the same pot, add the sliced onions and sauté until soft and translucent, about 5 minutes. Add garlic and cook for 1 minute.

    Stir in ginger, cinnamon, cumin, turmeric, and paprika. Cook for another 1-2 minutes until fragrant.

    Add chicken broth, diced tomatoes, chopped apricots, olives, and honey. Stir to combine.

    Return the chicken thighs to the pot, skin-side up, and spoon some sauce over them.

    Cover and simmer on low heat for 30-40 minutes until the chicken is cooked through and tender.

    Garnish with fresh cilantro or parsley and toasted almonds if desired. Serve hot with couscous or crusty bread.

    Prep Time: 15 minutes | Cooking Time: 45 minutes | Total Time: 60 minutes
    Kcal: Approximately 450 kcal per serving
    Servings: 4 servings

    #moroccanchicken #tagine #chickentagine #moroccanfood #northafricancuisine #slowcookedchicken #spicedchicken #apricotchicken #comfortfood #easyrecipes #mediterraneanfood #homemade #dinnerideas #couscousside #heartymeals #flavorfulrecipes #authenticcooking #familymeals #foodie #slowcooker

    Dive into the rich, aromatic flavors of this Moroccan Chicken Tagine! Tender chicken simmered with apricots, olives, and warm spices — pure comfort in a bowl.
    Moroccan Chicken Tagine Aromatic Moroccan Chicken Tagine with Apricots and Spices Ingredients: 4 bone-in, skin-on chicken thighs 2 tablespoons olive oil 1 large onion, thinly sliced 3 cloves garlic, minced 1 teaspoon ground ginger 1 teaspoon ground cinnamon 1 teaspoon ground cumin 1/2 teaspoon turmeric 1/2 teaspoon paprika Salt and black pepper to taste 1 cup chicken broth 1 cup canned diced tomatoes 1/2 cup dried apricots, chopped 1/4 cup green olives, pitted and sliced 1 tablespoon honey Fresh cilantro or parsley for garnish Toasted slivered almonds (optional) Directions: Heat olive oil in a large heavy-bottomed pot or traditional tagine over medium heat. Season chicken thighs with salt and pepper. Brown them skin-side down for 5-7 minutes until golden, then flip and cook for another 3 minutes. Remove chicken and set aside. In the same pot, add the sliced onions and sauté until soft and translucent, about 5 minutes. Add garlic and cook for 1 minute. Stir in ginger, cinnamon, cumin, turmeric, and paprika. Cook for another 1-2 minutes until fragrant. Add chicken broth, diced tomatoes, chopped apricots, olives, and honey. Stir to combine. Return the chicken thighs to the pot, skin-side up, and spoon some sauce over them. Cover and simmer on low heat for 30-40 minutes until the chicken is cooked through and tender. Garnish with fresh cilantro or parsley and toasted almonds if desired. Serve hot with couscous or crusty bread. Prep Time: 15 minutes | Cooking Time: 45 minutes | Total Time: 60 minutes Kcal: Approximately 450 kcal per serving Servings: 4 servings #moroccanchicken #tagine #chickentagine #moroccanfood #northafricancuisine #slowcookedchicken #spicedchicken #apricotchicken #comfortfood #easyrecipes #mediterraneanfood #homemade #dinnerideas #couscousside #heartymeals #flavorfulrecipes #authenticcooking #familymeals #foodie #slowcooker 🍲✨ Dive into the rich, aromatic flavors of this Moroccan Chicken Tagine! Tender chicken simmered with apricots, olives, and warm spices — pure comfort in a bowl. 🥘🌿
    0 Comentários ·0 Compartilhamentos ·16KB Visualizações
  • Missouri Beef and Mushroom Pasta

    Savory Beef and Mushroom Cream Pasta Inspired by Missouri Comfort Cooking

    Ingredients:

    12 oz egg noodles or fettuccine

    1 lb ground beef (or thinly sliced beef strips)

    2 tbsp olive oil

    1 small onion, diced

    3 cloves garlic, minced

    8 oz cremini or button mushrooms, sliced

    1 tbsp Worcestershire sauce

    1/2 tsp dried thyme

    1/2 cup beef broth

    1/2 cup heavy cream

    1/2 cup sour cream

    1/2 cup grated Parmesan cheese

    Salt and pepper, to taste

    Fresh parsley, chopped, for garnish

    Directions:

    Cook the noodles according to package directions. Drain and set aside.

    In a large skillet, heat 1 tbsp olive oil over medium-high heat. Add ground beef and cook until browned. Remove beef and set aside.

    Add remaining oil to the pan. Sauté onions for 3 minutes, then add garlic and cook 1 minute more.

    Add mushrooms and cook until softened and browned, about 5 minutes.

    Return beef to the pan. Stir in Worcestershire sauce, thyme, and beef broth. Simmer for 3–4 minutes.

    Reduce heat to low and stir in heavy cream, sour cream, and Parmesan cheese until combined.

    Add cooked noodles and toss to coat evenly in sauce.

    Season with salt and pepper, garnish with fresh parsley, and serve hot.

    Prep Time: 10 minutes | Cooking Time: 20 minutes | Total Time: 30 minutes
    Kcal: 560 kcal per serving | Servings: 4 servings

    #beefrecipes #comfortfood #mushroompasta #homemadepasta #midwesternrecipes #groundbeefideas #heartymeals #beefandmushrooms #easyweeknightdinner #pastadish #familyfriendlydinners #mofoodie #creamybeefsauce #savorysupper #pastaloversunite #beefstroganoffvibes #quickdinners #satisfyingmeals #eggnoodles #easyrecipes

    This Missouri Beef and Mushroom Pasta is creamy, hearty, and full of Midwestern flavor! Perfect for cozy nights in.
    Missouri Beef and Mushroom Pasta Savory Beef and Mushroom Cream Pasta Inspired by Missouri Comfort Cooking Ingredients: 12 oz egg noodles or fettuccine 1 lb ground beef (or thinly sliced beef strips) 2 tbsp olive oil 1 small onion, diced 3 cloves garlic, minced 8 oz cremini or button mushrooms, sliced 1 tbsp Worcestershire sauce 1/2 tsp dried thyme 1/2 cup beef broth 1/2 cup heavy cream 1/2 cup sour cream 1/2 cup grated Parmesan cheese Salt and pepper, to taste Fresh parsley, chopped, for garnish Directions: Cook the noodles according to package directions. Drain and set aside. In a large skillet, heat 1 tbsp olive oil over medium-high heat. Add ground beef and cook until browned. Remove beef and set aside. Add remaining oil to the pan. Sauté onions for 3 minutes, then add garlic and cook 1 minute more. Add mushrooms and cook until softened and browned, about 5 minutes. Return beef to the pan. Stir in Worcestershire sauce, thyme, and beef broth. Simmer for 3–4 minutes. Reduce heat to low and stir in heavy cream, sour cream, and Parmesan cheese until combined. Add cooked noodles and toss to coat evenly in sauce. Season with salt and pepper, garnish with fresh parsley, and serve hot. Prep Time: 10 minutes | Cooking Time: 20 minutes | Total Time: 30 minutes Kcal: 560 kcal per serving | Servings: 4 servings #beefrecipes #comfortfood #mushroompasta #homemadepasta #midwesternrecipes #groundbeefideas #heartymeals #beefandmushrooms #easyweeknightdinner #pastadish #familyfriendlydinners #mofoodie #creamybeefsauce #savorysupper #pastaloversunite #beefstroganoffvibes #quickdinners #satisfyingmeals #eggnoodles #easyrecipes This Missouri Beef and Mushroom Pasta is creamy, hearty, and full of Midwestern flavor! 🍝🍄🔥 Perfect for cozy nights in.
    0 Comentários ·0 Compartilhamentos ·17KB Visualizações
Páginas impulsionada